Hey everyone, I'm here today sharing a little something different today. It is hard to believe that we Christmas is nearly here! This year sure has flown! It is time to get gifts for loved ones so I decided to do a pillow pouch which in size can hold gift cards, money etc.
Here is the finished product which I created using the Tis the Season collection.
To create the pillow pouch I did a bit of googling to find a good pillow pouch template which I cut using my cameo. Such a gorgeous and practical little box. And something that is so versatile too. I see many pillow pouches being made in my immediate future.
To embellish the box I have wrapped a piece of 12″ around the entire thing. And then finished with some seam binding and a bow. I also created a fun little tag from the stickers, ephemera and veneer that coordinate with the goodies. I also added a little touch of typewritten journing.
The size of the pillow pouch is perfect for holding gift cards. And it is a nice way to jazz up a plain and simple gift card. I added some tissue paper to give the recipient a feeling of being able to unwrap too. Thanks so much for popping by the blog today. This gift idea would be perfect for family friends and even as a teacher gift!
Hey everyone, I'm here today sharing a new layout featuring the latest collection ‘Endless Summer’ collection. For this layout I decided to scrapbook another photo from our fun summer day here in our household.
I had a small floral design from Silhouette store and teamed that with a few fussy cut flowers. Here is the layout I created.
For the title and my journaling I used my silhouette and font I had in my library. I typed the words ‘cutie patooties’ and then created an offset which I cut out on the Sweet Treats paper. The journaling is typed and short and sweet, then cut into strip form.
To the right of the photo I added a small cluster comprising of fussy cut florals and die cut ephemera. And of course we can’t forget the woodies and enamel shapes. I adhered the pieces in a variety of depths to create some added dimension.
Here is my layout again. I’m hoping to have a process video for this one up on my You Tube channel very soon.
We have a winner from those who commented on my blog post here as part of the Altenew Dec blog hop.
The Altenew Scrapbook Kit Release Blog Hop winner is:
Kim
Please email Altenew at winner@altenew.com with the subject line "Relfection Kit Blog Hop Winner from Raquel's blog" to redeem your $30 gift certificate to the Altenew store.
I am here today as part of the Altenew December Blog Hop. I am so honoured to be able to take part with such an amazing group of creatives and get to play with the bright and fun new products by Altenew that are in the 'Reflection' Kit.
If you are wondering more about the kit which you can purchase here, here are the details:
Here is a little Kit Description from Altenew:
The bright and vibrant colors in this kit will take you back to all those happy moments captured at home or abroad. From trendy watercolor painted papers, to beautiful cityscape postcards and a wide assortment of embellishments, this kit is perfect for creating gorgeous layouts, wall art, mixed media projects, and many more!
The kit contains:
48 sheets of 12”x12” patterned paper (two of each design)
One 8.5”x11” cardstock sticker sheet
Two 6”x12” alphabet puffy sticker sheets
20 8.5”x3.5” watercolor cityscape postcards
One 2x3 photopolymer clear stamp set
20 epoxy buttons with adhesive back
34 cardstock and acetate die cuts
12 origami wood veneer shapes
Two white resin decorative frames
One 8.5”x11” chipboard sticker sheet
One rubber roller stamp
I shared and unboxed the kit over on my YouTube channel:
Here is the project that I created using this amazing and jam packed kit:
And the process video for it:
Here are some close up images of my project. I decided to stick to a vertical circular design for this page.
Journaling is something I do on pretty much every layout, and normally by using my typewriter.
There were a lot of bright colours on this layout, I loved the paler pink paper to mat my photo. It added that softness that I was searching for. Especially with such a soft photo. I absolutely loved the floral chipboard piece. It inspired the whole colour palette for this layout.
I just love this photo of my little man and his caring big sister.
So how can you win by joining in this hop? There are two ways to enter the draw today.
1/ To celebrate this release, Altenew is giving away a $50 gift certificate to THREE lucky winners! Please leave a comment on the Altenew blog by Wednesday, December 14th at 11:59pm EST for a chance to win. The winners will be announced on the Altenew blog on Thursday, December 15th.
2/ Leave a comment here to go into a draw to win a $30 gift certificate. Entries close Wednesday, December 14th at 11:59pm EST and I will draw and announce a winner here by Thursday, December 15th.
Here is the hop order (check out each blog and hop along for more chances to win a $30 certificate):
Before I go Altenew have a special *Promotion* happening to coincide with the release: Receive a FREE Scrapbook Class with every purchase of the Reflection Scrapbook Kit now through Saturday 12/17, 2016 at 11:59pm EST. When you purchase the kit, please email Altenew at academy@altenew.com with your order number and Altenew will provide instructions on how to redeem your free class to the Timeless Floral Layouts Class.
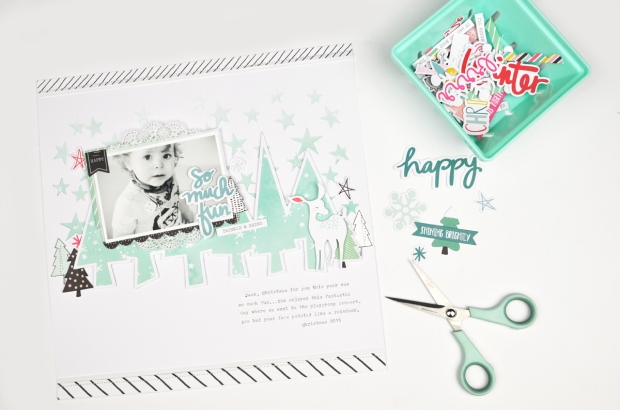
Hey everyone, I'm here today with my newest layout. I was so very excited to receive my November kits on my doorstep this week. This month I opted for the Main kit, embellishment, paper add ons and also the December Documented kit. Now, I do not do a daily December type of album as such. I have learned that I can never to commit to projects such as those, however, I do scrapbook multiple events around Christmas time so I thought it would be a great way to have my layouts looking cohesive around this fun event.
I decided today to create a layout where I only used the Main Scrapbooking kit. I also used Irit’s cut files for November. I wanted to be able to demonstrate to you that there is more than enough product in the main kit alone to create layouts. Yes I admit it is lovely to receive all the kits, but for those of you who may only receive the Main kit as a treat to yourself each month for whatever reason, here is a sample using it.
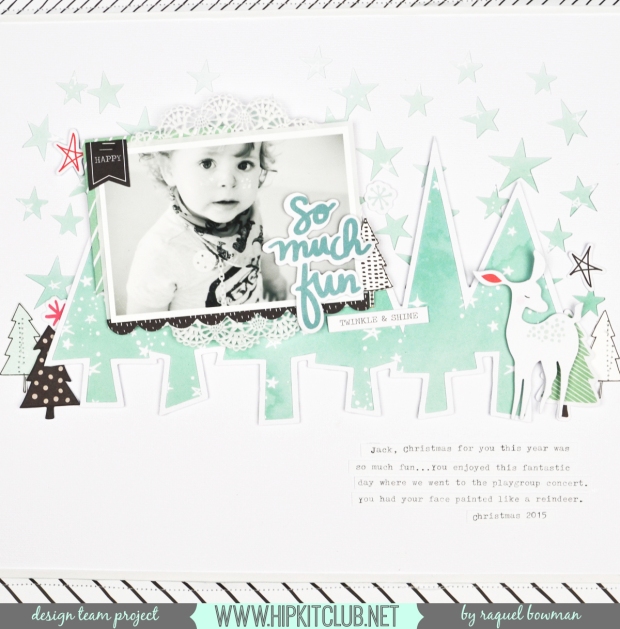
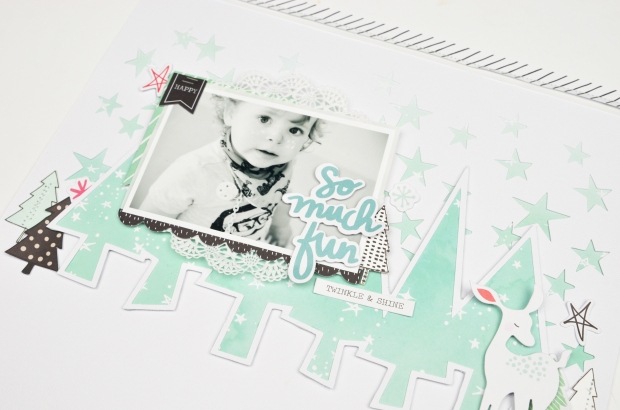
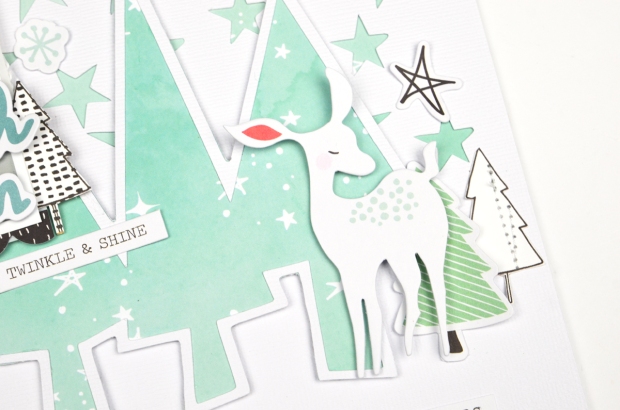
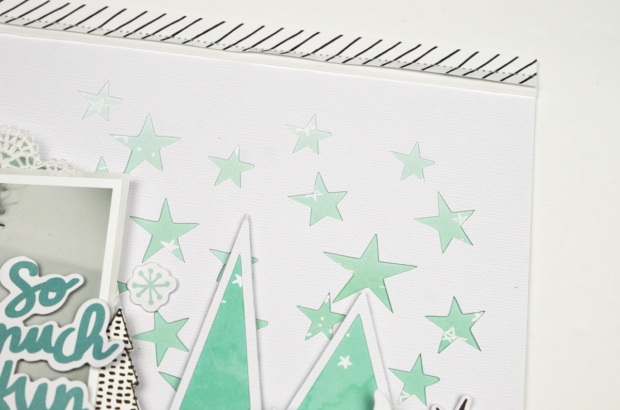
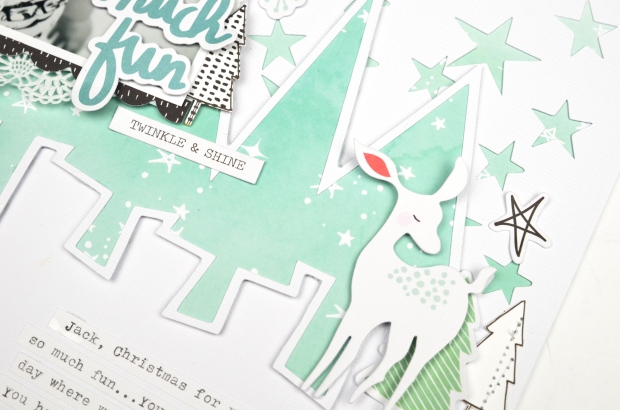
I documented this pic of my little man from christmas 2015. We had just attended a fun playgroup concert and fun day. This was post event, face painted and looking a little weary. I cut the star design from Irit’s files into the background and backed it with one of the exclusive papers. I also then backed the trees with the same paper but because the paper is coloured in a gradient, the tree paper looks darker which is what I had wanted to achieve.
I made a big focus on embellishments; mainly the Hip Kit exclusive ephemera. These are so amazing and so easy to create with.
The whole photo mat and the tree cut file itself was adhered to the page with foam to add that little bit of dimension. I also added a doily behind my photo (I really can’t help myself!).
Because I had the tree cut files running horizontally, I decided to handcut some trees from the Crate Paper patterned paper and create a very loose ‘woodland’ scene. I couldn’t go past this deer. He has a pop of red in his ear so I made sure to repeat the red element two more times on the page to balance it out.
I also loved the contrast that the black ephemera pieces brought to the page. The scalloped border was one of my fave pieces.
The photo itself is printed at about 75% the size of a 4×6″ and black and white (of course). To mat the photo I used the plain vellum in the card stock kit. I then cut an ephemera frame in half and placed one half to the top left corner.
The title was also an ephemera piece which I added directly to the photo in the negative space with foam tape. I love the shadow around its edges that is created because of that dimensional adhesive.
To create the star background I traced Irits design in my software, however I selected outline only so I only cut out the outlines of the stars. Meaning I could fill them in later with a patterned paper that I have done here.
I also added the ephemera text ‘twinkle and shine’ – his eyes really pop and glisten in the photo so I thought that sentiment was perfect.
The journaling was added to the page after I wrote it out on my typewriter, cut it up and adhered it to my page. Thanks so much for stopping by today. I hope this page has inspired you and shown you an example of what you can create with only the Main kit.
Hey everyone, I'm here today sharing with you my first layout using the amazing and gorgeous Moonstruck collection. As soon as I saw this stunning collection I just knew that I wanted to use this opportunity to scrapbook some more wedding photos. This collections palette is so dreamy and somewhat romantic so for me, it was the perfect choice. The photo I am using is just a 4×6″ black and white photo taken by our photographer.
Here is the layout I created: Watch over me
My inspiration for this page begun with my photo. After my wedding I had so many people tell me ‘I have never seen a happier bride’, ‘you didn’t stop smiling all day’ and you know what, it was very true and this picture captured that. Reflecting on our day back in 2011 I was thinking about the song that we danced to. The song is called ‘Watch Over Me’ and it is by an Australian Solo Artist, Bernard Fanning. It is truly a beautiful song and the lyrics bring a tear to my eye every time I hear it.
I could not go past Paper 02 in this collection with those big and beautiful florals, seriously divine! I fussy cut these out and added them to either side of my photo. So feminine, so pretty, and very perfect for the overall tone of this layout and what I was wanting to convey.
As a feature on this page I decided to type up the lyrics into a word document and print them on an A4 sized piece of paper in a typewritten text. To ensure the text coordinated with my page I made the colour of the text ‘coral’, the same colour which is featured in the collection. I guess you could say I created my own patterned paper that was specific to this page and photo. I think this is a pretty cool idea and one that I have used before on a couple of past layouts. It has meaning to my page but also looks effective.
I cut my title on my Cameo and it was simply the title of the song ‘watch over me’. I cut it on white cardstock and added a single line of machine stitching through it to add texture. It also meant that I could fold the top and bottom of the letters up to add some dimension and to create shadows which allow you to distinguish the white title from the white background.
In the top right corner I added a small cluster that comprised of some of the gold rub ons and a fussy cut floral and a word from Paper 09. This helps create a visual triangle on the page and for me was a necessary addition as it provides my page with balance.
The cluster to the right of the photo is mainly made up of the florals from Paper 02, however I also added a die cut heart from the ephemera pack, the ‘you are my happy’ text cut from paper 09 and some of the gold rub ons. To add some softness to the florals I tucked in some die cut white leaves and a doily behind my photo too.
One tip I have for you when using the Moonstruck collection is for the rub ons. Sometimes I find it hard to commit to the placement of rub ons in a layout design. To combat this I add the rub on to white card stock and fussy cut it out. This gives me a DIY ephemera piece that I can add to my layout, like the butterfly in the below image.
I hope this layout has inspired you today. The Moonstruck collection is just so beautiful and so easy to work with!
I will be sharing a process video for this layout on my YouTube channel very soon!
Hey everyone, today I am here sharing a new layout I created using the September Hip Kits. It is 'Gratitude/Family' week and I was also given the challenge of -no white!!! No white! What is that!?! ha. I do not remember the last time I had a layout without white card stock on it. But I accepted the challenge and here is what I came up with:
Hello Sweet
For this layout I have used the amazing September kits featuring the Crate Paper, Inc. Gather collection and a photo of my daughter and son not long after he was born. One of the Crate Paper tiny word stickers summed up this moment 'my heart is full', just the perfect sentiment to describe this photo. The sticker was hard to get a photo of due to the foiling.
I have a vertical strip on the left of the page grounding the photo and have embellished diagonally across the page. I added a fringe to the layers and some gold paper from my stash.
The embellishing contains mainly layers of the Gather ephemera, a tassel, chipboard and dimensional stickers, with a touch of Pinkfresh Studio chipboard hearts, Simple Stories enamel dots.
The title was a mix of the ephemera and chipboard stickers by Crate.
It was a strange thing for me to have a patterned paper as the base of my layout instead of my white card stock base I am so used to. I hope you think I have met the challenge!
Hey everyone, I'm here today sharing a new layout using the beautiful Love Always collection by Cocoa Vanilla Studio.
This layout is for the Creative Scrappers sketch challenge #299 which you can see below. Cocoa Vanilla are the sponsors for this months challenge and each of us on the team have created a layout based on this fun sketch using the CVS products.
The style and layout of the sketch itself is quite different to a design I may gravitate towards so I had to be a little creative when creating my layout for this.
Here is the layout I created.
I kept the design of the four photos, but instead of the larger size portrait style photos I chose to use four smaller ones. I matted each photo on some of the patterned papers in the collection. One of the photos in the four though I wanted to stand out a little more than the others, so I matted that on a different patterned paper, added a doily behind it and mounted it to the page with foam tape. I adhered them in a scattered horizontal formation to add a little interest to them.
The chipboard tabs, stickers and puffy stickers add a nice little detail to the layers. I used multiple layers of patterned paper like the sketch on this layout. To add a little detail to each layer I added some machine stitching to the edges.
Like the sketch I have an embellishment cluster to the left of the photos, the right of the photos and the bottom right of the page. Instead of using stars I have mainly used floral embellishments from the collection. I used sequins as the circle element to the sketch which add a nice finishing touch to each cluster.
I decided that I wanted to swap the placement of the title and the journalling. I did this because I felt the space under the smaller photos needed to be filled with my story rather than the sticker I had selected to use as a title.
For something different I used the stickers to act as the title on my page. This formed the bottom right cluster in the sketch and combines a lot of different layers of embellishments. I used die cuts, stickers and veneer. I added the sequins and also one of the floral resins from the Bits & Pieces pack.
I wanted to still add a star element to my page seeing as though the sketch featured it. So I decided to use a large Star cut file shape to back with a patterned paper and to make it a main part in the design of the page. I just loved how it turned out!
Thanks for stopping by today, you can check out the sketch here
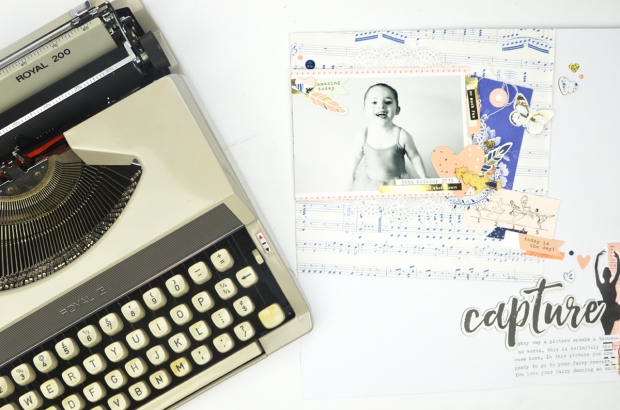
Hey everyone, I'm here with you today sharing my first layout I have created using the September kits. For this layout today I focused on telling the story behind the photo, something which I do regularly on my layouts. I also based this page ‘loosely’ on the September sketch which has a diagonal design and includes the title and photo in the same placement.
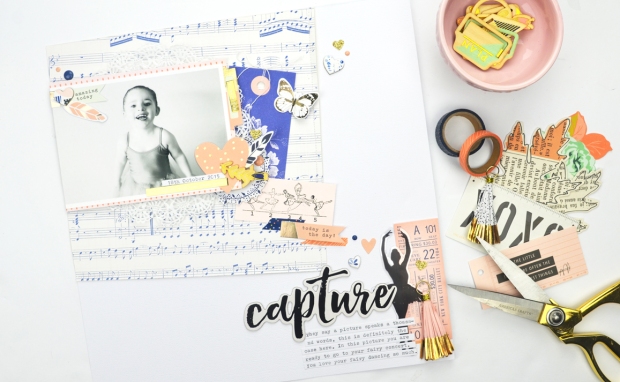
Here is the layout I created:
Here is the process video for this layout
These September kits are seriously gorgeous! I am absolutely loving the colour palette and had so much fun diving in to create this layout.
I shared an unboxing video over on YouTube, here it is here incase you missed it
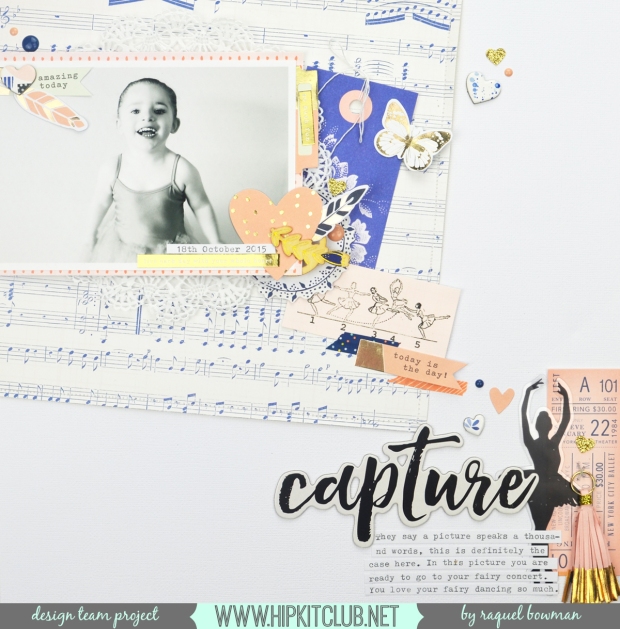
The photo I am documenting really just speaks volumes. I just adore the look of happiness on my little girls face and this is the story I wanted to tell.
To tell my story today, and on most of my layouts, I used my typewriter. As I have mentioned in previous posts, I love how quick, easy and visually pleasing typewritten journaling looks on layouts. Typewriters are something that can be picked up at retro or vintage stores, charity shops and some of you may have even seen that We R Memory Keepers have released a 12″ compatible typewriter called the Typecast. That beauty is definitely on my wish list, but for now my Royal will do!
After I have typed my story on my typewriter, I always tend to cut it into strips. I really love the look of strip journaling and it also means that I can weave and adhere the story around the embellishments that are already placed on the page.
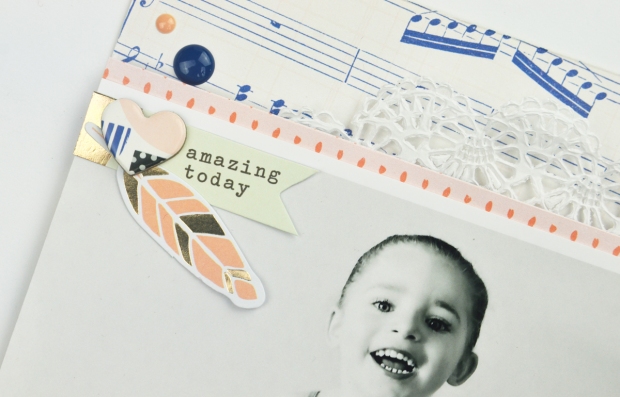
Here are some close ups of the layout:
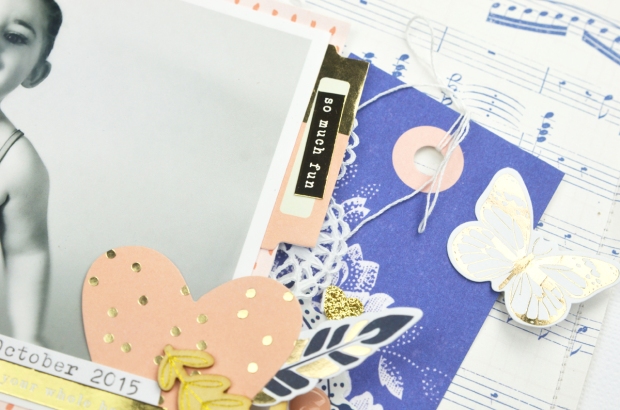
I added a small cluster on the top left of the photo. This just helped to balance out the layout as it was quite ‘right side heavy’.
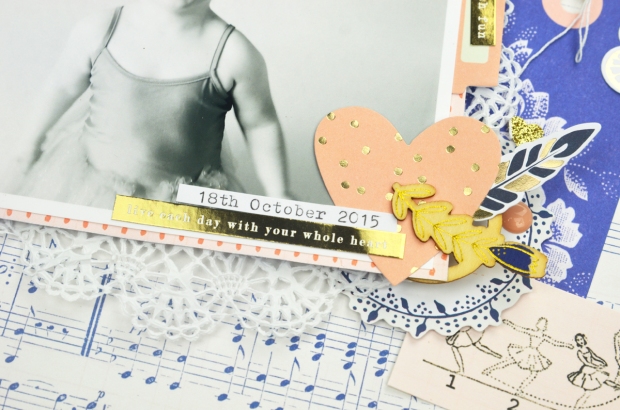
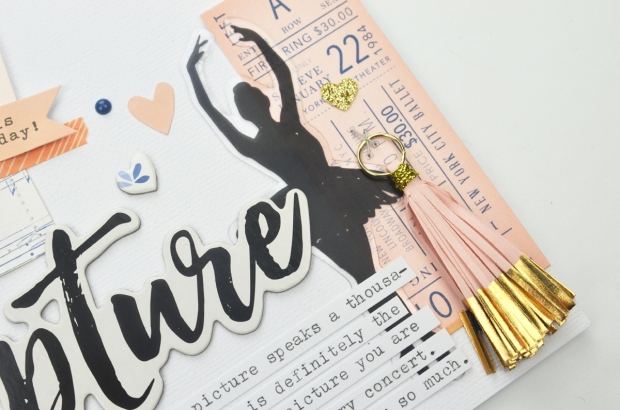
It was so fun layering and adding the cluster to the right of my photo. The Gather ephemera from the Main kit had a lot of ballerina related icons and cards which I was able to include here. Plus they suited the royal blue/coral/pink colour palette I had chosen.
The sketch image had a tab to the top right of the photo. This one I included on my page was from the Simple Stories ephemera pack that can be found in the Project Life kit. These are actually a double tab which you can fold over, so I cut it in half so I could use the other piece on a future layout. I also added a crochet thread bow to the top of the tag in the Gather ephemera pack.
How perfect was that little ballerina piece? I did a happy dance when I found that in the pack.
There was also the large acetate ballerina in the Gather ephemera pack. I love how this looks on the layout. Don’t forget to peel off the clear film on the acetate pieces in this pack. I teamed this with the ‘capture’ title from the Gather thickers in the Main kit and the amazing Cute Girl tassel from the Embellishment kit. To secure the tassel to the page I simply stapled it on. Super quick and easy!
The whole photo mat was adhered to the page with a foam sheet. This adds an even amount of dimension to the mat area. I love the subtle touch of dimension it brings to the layout.
Thanks for stopping by the Hip Kit blog today. I hope this post has inspired you to tell your story on your layouts and has shown you how quick and easy it can be.


 Here is the layout I created.


